Microsoft Word Import Settings Reference
When importing an MS Word document, there are quite a few options on the Import Wizard pages that allow you to specify the import settings as per your requirements. In this topic, you will get an in-depth overview of those settings.
| Option | Description | |
|---|---|---|
|
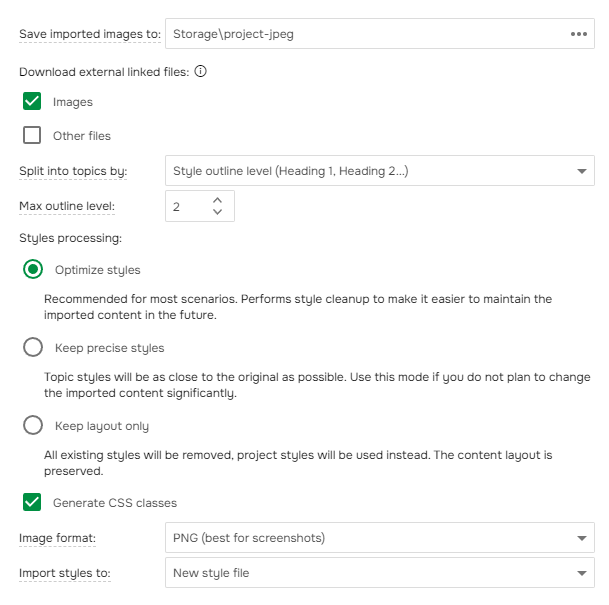
Save imported images to
|
Allows to specify the location into which all images will be extracted.
Only available when importing into an existing project.
|
|
|
Download external linked files
|
Enables you to download images and files linked from your content, but not included in the archive.
|
|
|
Split into topics by
|
Defines how the imported document will be split into topics.
|
|
|
Max outline level
|
Configures the maximum TOC depth of the imported document.
|
|
|
Optimize styles, Keep precise styles, and Keep layout only
|
Allow you to configure how ClickHelp should handle the styles in your MS Word document after importing it. In the dialog itself, you can read some basic information about those three options. To get more in-depth information, check the Handling Content Styles help topic.
|
|
|
Generate CSS classes
|
If enabled, inline styles from the imported project will be copied to a CSS file, and CSS classes will be created with automatic names for repeated classes. CSS classes are created for all the imported styles. The names of the CSS styles represent their encoded attributes (for example, for the bold font, the class name is cs0719DCD37). This means that two CSS rules with different names but with the same properties will be detected and merged into one rule. For this to happen, we strongly recommend using the Existing style file and Optimize styles options, especially, when uploading multiple documents into one project as the style cleanup is performed, and duplicated styles are handled. If you need to find and replace those created CSS classes, use Global Find and Replace. |
|
|
Image format
|
Allows you to select the desired format for image files. There are two available options: JPEG and PNG.
|
|
|
Import styles to
|
Allows you to configure how the imported styles should be treated — whether they will be copied to a new style file or to a file existing in the project.
Only available when you import the document into an existing project with the Generate CSS classes option enabled.
|