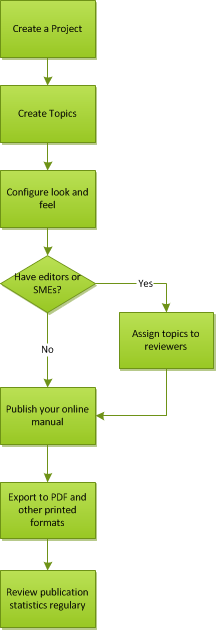
Typical Help Authoring Process
The goal of any help authoring process is to get a user manual in the end. In ClickHelp, everything starts with creating a project to write the content. And the final goal may be interpreted as getting a user manual published online and accessible to readers, that is, publishing your project to create a publication. Depending on the structure of your technical writing team, the path from project to publication may vary. ClickHelp does not enforce one specific workflow - you choose how to work on a project to achieve the final goal. We will learn what a typical process looks like and what parts it contains in this topic.
Create a Project
When you start working on a user manual, the first step is to create a new project in ClickHelp. The project will be the container of the help topics you create and the place for technical writers to collaborate.
Click Create Project on the Projects page to open the project creation wizard.
When creating a new project, you can select any existing pre-designed templates. You will modify the project style later, no matter what template you choose.
Create Help Topics
Upon project creation, select it in the projects panel, and click Open Selected Project on the toolbar - the project editor will open.
You will see the table of contents on the left side of the screen. On the right side, there will be the selected topic body. To create a new topic, click the Create New Topic button on the toolbar of the Contents panel. A new topic with default content will be created and opened.
To modify the topic contents, click the Edit button in the top-left corner of the topic content. Once you do this, the current help topic will be locked for other contributors, so they can't interfere while you are working on the content. Then, the topic contents will switch to the editing mode.
If you take a look at the bottom of the topic editor, you will see three tabs:
- Design - this is the visual editor of the topic contents. You can perform all typical content creation and editing tasks in this editor.
- Source - shows the HTML source of the help topic. Useful when you need to use tricky CSS effects or implement some non-standard layout.
- Preview - shows a preview of the final output, expanding all variables, snippets, and conditional blocks. It may be used to quickly check what the topic will look like in various publish configurations.
Configure Look and Feel
Check the Branding options group in global settings to make your documentation portal better match your company style. Specify the favicon, your logo, and other settings.
One more thing you may want to modify is the documentation portal home page - this is the page shown when your readers navigate to your portal URL without opening any specific help topic. For example, this link points to the home page of our documentation portal: http://doc.clickhelp.co.
Assign Topics to Reviewers
When a help topic is ready, you can assign it to a reviewer - a subject matter expert, a technical editor, documentation team manager, etc. This is done by changing the Assignee field and setting the status to Under Review. Using statuses is not required, but it may be helpful to make it easier to see the project progress, filter topics in the Contents tree by statuses, see the topic distribution by statuses in the project statistics, etc. When a review is completed, the reviewer will change the topic status to Ready and assign it back to the topic owner.
If reviewers have notes or questions about the topic contents, they can add Review Comments for the owner to handle them.
Whenever a topic is assigned to a user, an e-mail notification can be sent to the assignee - you can control this behavior in your portal settings. Those notifications may include several latest review notes to give some context to the assignee.
Publish your Online Manual
When all help topics are ready, you can finally publish them to make them accessible to readers. To do this, you select the project on the Projects page and click Publish/Export on the toolbar. In the wizard that opens, you specify what you want to do - only publish the manual, or publish and then export to a printed format. Note that you can export any publication to a printed format later after publishing.
In the publishing wizard, specify the visibility of the publication being created. For example, you can publish in the Private mode for final review and then change the publication visibility to Public later in the publication properties.
The publication name you specify in the wizard will be visible to the readers, so make it self-descriptive.
Export to Printed Formats
You can export any publication to one of the supported printed formats: PDF, DOCX, ODT, ePub, etc.
To do this, select the needed publication in the projects tree and click Publish/Export on the toolbar - the publishing wizard will open. You will need to specify the format first. One other important thing is the export configuration: if you don't have one yet, you might need to create one. Export configurations store the exporting settings for further re-use.
On subsequent steps of the publishing wizard, you can configure many style-related parameters to make sure your printed documents look good.
Track Statistics and Improve Content
ClickHelp provides statistics for both projects and publications, though the parameters collected are different.
Project statistics can help you understand the project progress and readiness. It shows article distribution by statuses or by topic owners - you can see how many topics are ready, and how many are still in the progress.
Publication statistics show how many views each help topic gets, and how your readers navigate to that topic. It will also show you the topic ratings if readers are voting for topics. It may help you identify those topics that need to be improved and perform additional review of that topic.