Content Snippets
Sometimes, you need to use the same chunk of content in multiple topics. This is not a single value that can be stored in a Variable but a part of HTML content that needs to be shared by several topics. Use the content snippets functionality to achieve this.
First of all, you create a new topic to put your shared content into. This can be content of any size - small chunks for legal notices at the end of topics or complete instruction sets with images and external links used across locations.
Once you have created your topic with the shared content, you can disable the Show this node in the TOC option in the General section of topic properties if the topic should not be present in the TOC but should be available via a direct link. Alternatively, you can set its publishing mode to Do not publish in the same section - in this case, the snippet topic will not be included in publications as a separate topic.
The next step is to include the created topic contents into a different topic.
Creating Snippets
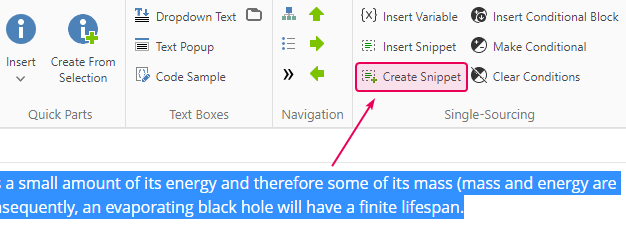
To add a content snippet using the Design mode, do the following:
- Navigate to the Insert tab on the editor's ribbon.
- Click Insert Snippet in the Single-Sourcing section.
- Start typing the topic's title or ID in the input field, and select it from the dropdown list.
- Click OK, and the block with the chosen snippet will appear.
Even if the topic you got the snippet from isn't published due to its settings, the snippet's content will be successfully included in your topic in question and visible after the publishing process is completed.
Alternatively, you can simply select the content and click the Create Snippet button in the Single-Sourcing tab of the ribbon:
When you convert the selection to a snippet, the newly created snippet-topic will have the Do Not Publish mode and the Do Not Show in TOC option enabled. It is recommended to set these options for the manually created snippets as well.
Deleting Snippets
If you want to delete a content snippet, proceed with these steps:
- Select the block by clicking the element in its top-left corner (it displays the name of the topic you've taken the snippet from).
- Press Delete on your keyboard or click the Delete Element button in the Tag Inspector line above the editor.
Here is the HTML syntax to use in the Source mode to add a Snippet element:
HTML |
<ch:snippet url="/articles/PROJECT-URL/TOPIC-URL"/> |
The URL attribute of the tag is the URL of the topic to include. To get the URL for the needed topic, open that topic and check the address bar of the web browser. The topic URL you need to use is the entire address part after the server name - we will highlight it in red:
http://doc.clickhelp.co/articles/PROJECT-URL/TOPIC-URL
Dynamic Elements in Snippets
In ClickHelp, there is a number of dynamic elements which are sensitive to the context. That is, they render differently depending on different factors. A good example of such an element is the Breadcrumb - it shows the TOC navigation path, and it depends on where the current topic is located. If you move the topic to a different TOC branch, Breadcrumb will automatically reflect the new position. The same thing applies to the Next/Previous/Top topic navigation elements and the See Also block. All dynamic elements are compiled into static content during the publishing process. That is, in Publications, all dynamic elements get compiled into static HTML content for every help topic, depending on the context of that help topic.
It is possible to use dynamic elements inside of Snippets. When such a snippet is inserted into different topics, the dynamic elements will be rendered in the context of their final destination after publishing - the final topic where the dynamic elements end up after expanding all snippets.
This means, for example, that you can use the Breadcrumb element inside a header snippet which you insert into every topic. During project publishing, the Breadcrumb content will be expanded for each of the topics individually and will be different for different topics.