Working with Block-Based Topic Editor
| The Block-based Topic Editor is currently in the beta stage; the functionality is subject to change and will be continuously improved. |
The Block-based Topic Editor allows users to create structured content using various types of blocks for headings, paragraphs, lists, images, tables, and more. This block-based approach means easy customization and organization of content where each block can be individually added, edited, moved, and formatted to suit your document's needs.
This guide will walk you through the essential functions of working with blocks, like adding and editing or formatting and organizing them.
- The View and Edit Modes
- Create a Block
- Edit a Block
- Move a Block
- Working with Lists
- Multiline Blocks
- Saving Content
The View and Edit Modes
The Block-based Topic Editor provides two primary modes for working with your topics: the View mode and the Edit mode.
In the View mode, the topic content is displayed but cannot be modified. This mode is useful for reviewing the final layout and structure of your document without the risk of accidental changes.
Edit mode is designed to create and modify your topic content. Once in this mode, you can add, edit, format, or rearrange blocks to structure your document. Read this topic further to learn the details.
To start editing, click the Edit button at the top of the interface.

To switch back to View mode, click the Unlock&View button in the same place.
Create a Block
To start adding content, you need to create blocks:
-
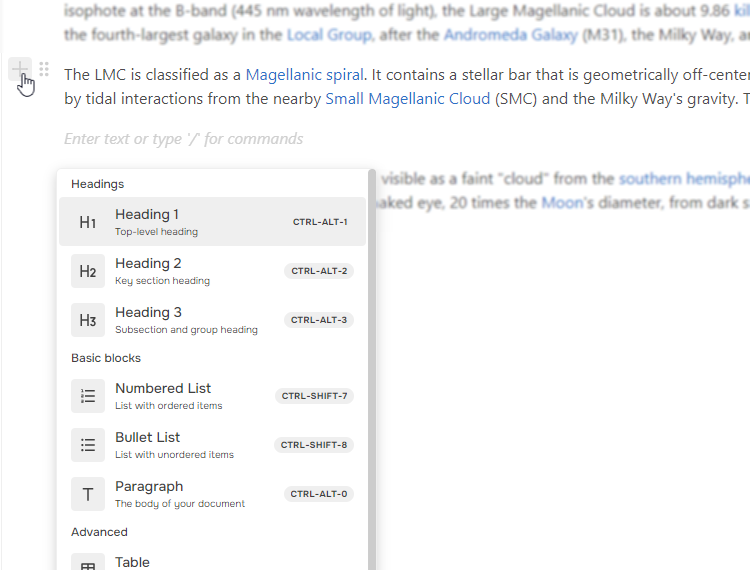
Hover your mouse over a block, after which you want to add a new block, and click the "+" option on the left. A list of available blocks will appear.

Alternatively, you can click into the bottom empty block and type / to bring up the same block list. -
Click on the block you want to insert.
Some of the blocks can be inserted using shortcuts like Ctrl+Alt+1 for Heading 1. These shortcuts are shown next to the block names in the list.
Once the block is inserted, you can start adding your content.
Edit a Block
Each block in the editor is customizable. You can edit both the content and appearance of each block:
-
Direct Editing. Click on a block to enter edit mode and modify its content.
-
Contextual menu. Hover over a block to reveal the six-dot handle on the left. Click it to access additional options, like deleting the block or changing the text color.

-
Popup menu. When you select text within a block, a popup menu appears, allowing you to apply quick formatting options without leaving the editor interface. The popup menu includes options like:
- Bold, Italic, and Underline. Apply text styling for emphasis.
- Text Color. Adjust text color from a preset palette.
- Links. Insert hyperlinks to add navigation.
- Block type. For Headings and Basic blocks it is possible to change the block type directly from the popup menu.

| The options available in the mentioned contextual menu and popup menu can be different for different block types. |
Move a Block
To rearrange blocks within your content:
- Hover a mouse over a block you want to move.
- Click and hold the six-dot handle on the left side of the block.
- Drag the block to reposition it within your content.
- Drop it in the desired location when you see the placement indicator.
|
Blocks can be moved with the keyboard shortcuts!
|
Working with Lists
Creating and managing numbered and bullet lists is simple with the Block-based Editor:
- Insert a Numbered List or Bullet List block as described above.
-
Use Tab to increase the indentation level and Shift + Tab to decrease it. This allows you to create multi-level lists and manage list structure easily.
The popup menu also contains the Nest block and Unnest block options to control the indentation.
Multiline Blocks
When you work with such blocks as headings, paragraphs, and lists, hitting Enter on your keyboard creates a new block under the current one and moves the cursor to it. But sometimes, you might need to move to the next line within the current block. To do it, you can use the Shift+Enter shortcut.
Saving Content
This is the easiest part, as you don't need to do anything! The editor automatically saves all the changes right away.
If you want to revert the last changes made, you can use the Ctrl+Z shortcut. It works for both actions within blocks and actions with blocks themselves.
The Version History functionality works for the Block-based Topic Editor as well, creating a new version each time you exit the editing mode by clicking Unlock&View.