Insert Links
When editing a topic, you can insert several types of links to the content. You can link to another topic or to an external web page, or even use the so-called mailto link or contact e-mails in your content. Let's see how all these link types can be inserted.
- Link to Another Topic
- Link to an External Web Page
- Mailto Link
- Link to a Section of a Help Topic: Anchors
Link to Another Topic
- While in the editing mode, select some topic text that will become a link.
- On the Insert toolbar, click Link.
- In the Insert Link dialog, make sure the Topic option is selected.
- In the Topic field, start typing the title of the topic you want to link to.
-
As you type, the dropdown box will show the list of topics with titles containing the entered text.
Below each element, you will see the project name where that topic is located - this will help you select the right topic. - Select the needed topic from the dropdown list.
- Click OK.
When linking to another topic, you may want to link to a specific section of that topic. If the target topic has elements with assigned ID attributes, you can select one of those elements in the Anchor field of the Insert Link dialog.
Link to an External Web Page
Inserting a link to an external web page is similar. You just need to select the Web Link option when the Insert Link dialog opens and specify the target location in the URL field.
Mailto Link
This type of link is useful when you need to mention a contact e-mail address in topic content. Most browsers can handle such links and automatically open a mail client with a new e-mail message created. That message will have the contact e-mail filled in.
To insert this type of link, just select the Email address option in the Insert Link dialog.
In addition to the contact e-mail address, you can also specify the subject line in the link properties by filling in the Subject field in the dialog.
Link to a Section of a Help Topic: Anchors
This type of link is called an anchor link. When you follow such a link, the browser will automatically scroll the page to a specific element. This is useful for long help topics when you need to point someone to a specific part of it.
This can be easily performed via the Design mode, using the Anchor element.
- Go to the Insert tab of the editor's ribbon.
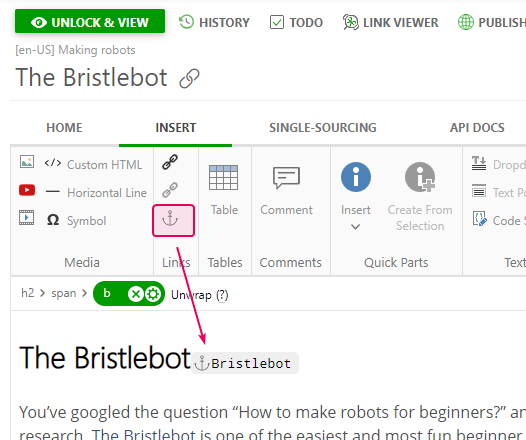
- Place the cursor next to the title where you want to create an anchor.
-
Click the Anchor item and type the Anchor Name (it must be an alphanumeric string without whitespaces), click Ok. On the screenshot, an anchor for Wand is created.
- Proceed to the topic where you want to insert a link to the created Anchor by placing the cursor to the point where you are going to insert the link.
- Click the Link element on the ribbon.
-
In the menu that appears, find the topic you'd like to refer to in the dropdown Topic menu, the needed headings, and Anchors that you've created in the drop-down Anchor menu. Then, type the text that will be displayed in your topic and tooltip's text (if needed).
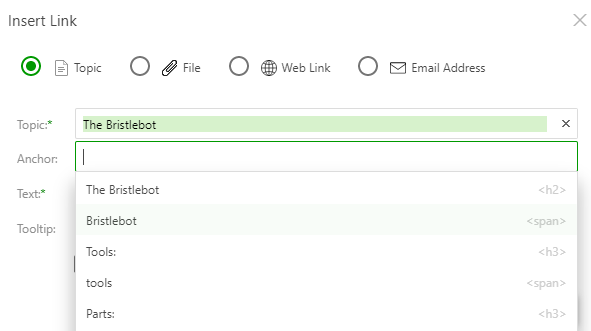
- Additionally, you can make your anchor link open in a new window, just enable the corresponding check-box in the Insert Link dialog.
-
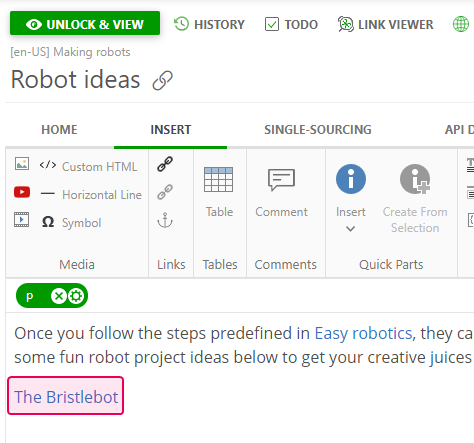
Click OK. Now, in the View mode, clicking the inserted anchor link will lead you straight to the desired topic section. You can see the blue link on the screenshot below.
-
You can also create the Anchor for a paragraph. Open the Source editor and specify its ID.

- And then insert the Anchor according to the steps described above.
To get the link of a heading, click the chain link icon that's next to a heading, in the View mode, and the link will be visible in the browser address bar.
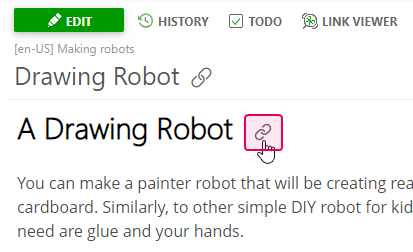
Anchor IDs look like h2_949787092 by default, but you can change them according to your needs. To do this, open the Source editor and change the ID.
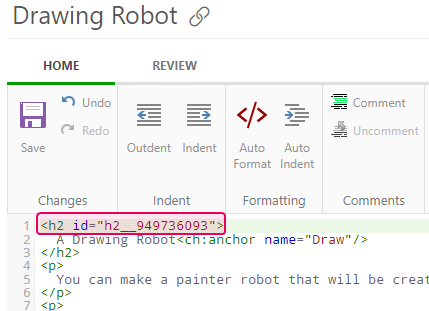
If you change the ID, don't forget to change the link in every topic where you've inserted this Anchor. You can use Global Find & Replace for that.