Branding & Styling FAQ
This topic is dedicated to frequently asked questions related to visual appearance of your portal and your content.
Portal Reader UI FAQ
Can I make my portal look like our website?
Yes. ClickHelp supports flexible branding of your documentation portal using CSS. To learn more, refer to Branding and Styling.
Can users leave feedback or comments for topics?
Yes, there are two features: the topic voting & rating, and commenting. By enabling GraphComment or Disqus integration you can get a great feedback channel. To learn more, check Gather Reader Feedback.
Can I hide the topic header area (title, Updated On, etc.)?
Yes. This can be done via Global Settings → Reader Interface or in the same section of Project Settings for every specific project or publication.
I don't know CSS but I want to design my portal, can you help?
Our Branding Team will be happy to help, contact us at support@clickhelp.com and describe what you'd like to achieve.
Content Styling FAQ
Can I style my content using CSS?
Yes. You can set content styles either from a CSS file or with inline styling. However, we recommend using CSS as, in the long run, content maintenance will be easier this way. Learn more on project style files: Project Styles and Scripts.
Can we have more than one style file for a project?
Yes. You can specify several CSS style files for a Project. This may be useful when using different style sheets for different output types or versions of your documentation. To learn more, refer to Project Styles and Scripts.
How to add or modify a CSS or style file?
All style files are saved in your ClickHelp File Storage, so you can open them from File Manager or upload new files. To manage the style files of a specific project, go to Current Project → Settings → Basic Settings. Under Project Styles, you can create a new style file, add an existing one, or edit it. To learn more, refer to Project Styles and Scripts.
If I update a CSS style sheet of my project, will all topics automatically start using it?
Yes. After you click the save button in the CSS file editor, all the changes will be reflected in the project topics. Just refresh the page to see the changes in a topic that is already open. When a topic is in the editing mode, click Refresh CSS Styles in the Styles section on the Home tab of the Design mode ribbon bar - this will reload the styles without leaving the editing mode.
How can I use custom icons for the Previous/Next/Top navigation elements?
Can I use paid fonts in my portal (like Typekit)?
Yes, this is possible with ClickHelp. As a rule, to use a paid font on some web resource, you just need to add the web resource domain name to the allowed domains in the font vendor licensing settings. For details, read this topic: Using Paid Fonts.
How do I use the Calibri font for all the text in my documentation?
You need to add a style rule for the Paragraph element to your project CSS file. To learn how to open your project CSS file for editing, check this topic: Open a CSS Style File. Here is a sample CSS rule you can add in any place of the CSS file:CSS |
/* Navigation element styles */ |
This rule above defines the font for all Paragraphs that don't have inline styling or specific CSS classes assigned. If some paragraph has inline styling that overrides this rule, you can use the Clear Format ribbon bar button to clear the inline formatting for that paragraph and use the default Paragraph style from the project CSS file.
Header and Footer Customization FAQ
Question: How to edit headers and footers visually?
Create the My Footer topic which will be used as a header/footer snippet. Then, open Topic Master Page and add the following code to a header and/or footer where a snippet URL is a link to the topic that you want to add:
CSS |
/* Navigation element styles */ |
The topic content will be added to the header/footer as a snippet referencing the topic you created, so you will be able to change the header/footer visually via editing the My Footer topic in the topic editor.
How to add common text information like a product name or support phone number to headers/footers?
You can use Variables for that. Header/footer content becomes a part of topic markup when publishing and it's handled as regular topic markup, so you can use both project and global variables there. Just open Topic Master Page and add the following code to a header and/or footer:
How to add breadcrumbs, See Also blocks or other automatic navigation elements to every topic of a project?
Open Topic Master Page and add the following code to a header and/or footer:
You also can style the breadcrumb in a centralized way via the CHBreadcrumb CSS class in project styles or with inline CSS:

Here is the result - grey line for the breadcrumbs container:
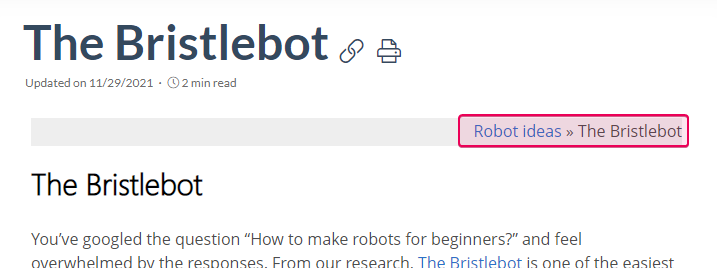
This way, you can add different navigation blocks such as links to top, next, previous topics, and See Also.
How can I create different headers/footers for different publications from a single project?
You can use conditional blocks inside the Master Page fields. For example, to exclude content from documents with the PrintedDoc output tag, you can use excluding blocks:
As a result, documents published with other tags will include the support e-mail address, and the printed version will not have it in the header or footer.
If you want to see some content only in documents with the PrintedDoc output tag, you can use an including block in the same way:
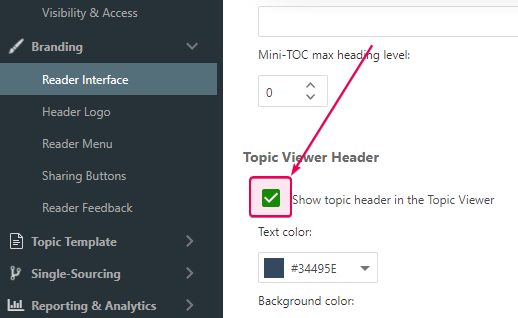
How to remove the default header?

Answer: In order to remove it, go to Tools → Portal Setting → Branding → Reader Interface, and uncheck the Show topic header box. Note that the changes apply to reader UI only, so you will need to log out or open the portal in the incognito/private browsing mode to see the effect.
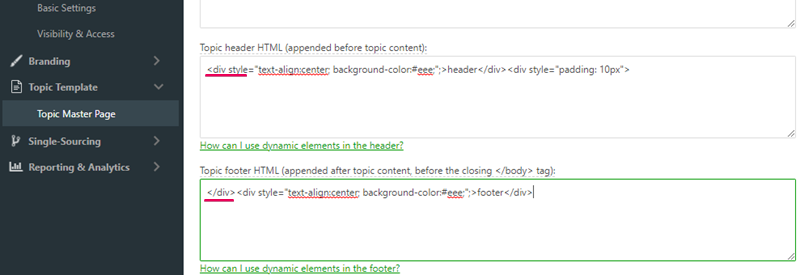
How can I adjust margins and spacing around the topic body area?
You can create a special wrapper DIV element around the topic content, and control the margins through the styles of this container. To achieve this, open the div tag in a Master Page header and close it in the Master Page footer, as it's shown on the screenshot below.
Do header/footer settings affect my existing publications?
Publications have their own header/footer settings, which are not affected by global settings. When you publish a project, the publication gets a "snapshot" or a copy of the current header/footer settings applied to each topic content. When the publication is created, the headers/footers become a part of your publication topics content and therefore cannot be updated in a centralized way after that. In order to update headers/footers in your publication, you should republish your project using the Update mode. If you republish your document through the Incremental Update mode, you'll add new articles with new headers/footers but you will not upgrade the old ones.
How are headers/footers handled during publishing?
Header/footer content is added before/after your topic content, so it is handled like regular topic content and may contain any dynamic elements (snippets, variables, conditional blocks, etc.) a topic may contain. A newly created publication gets the Use Global Settings box unchecked and its header/footer settings cleared in master page settings.