Import Wizard Reference
This topic talks about the Import Wizard and its options. To invoke the wizard, navigate to the Projects page and click Import document.
Alternatively, you can start the process by clicking Import at the bottom of the TOC on the Topic Editor page. In this case, the documents are imported to the root level of the current project.
Step 1. Start
The Import Wizard starting page is always the same whether you import from a documentation tool like Confluence or a document format like HTML.
The upper part of the wizard contains a selection of popular formats and documentation tools to import from. Once you click one of them, a section with general project settings will appear below.
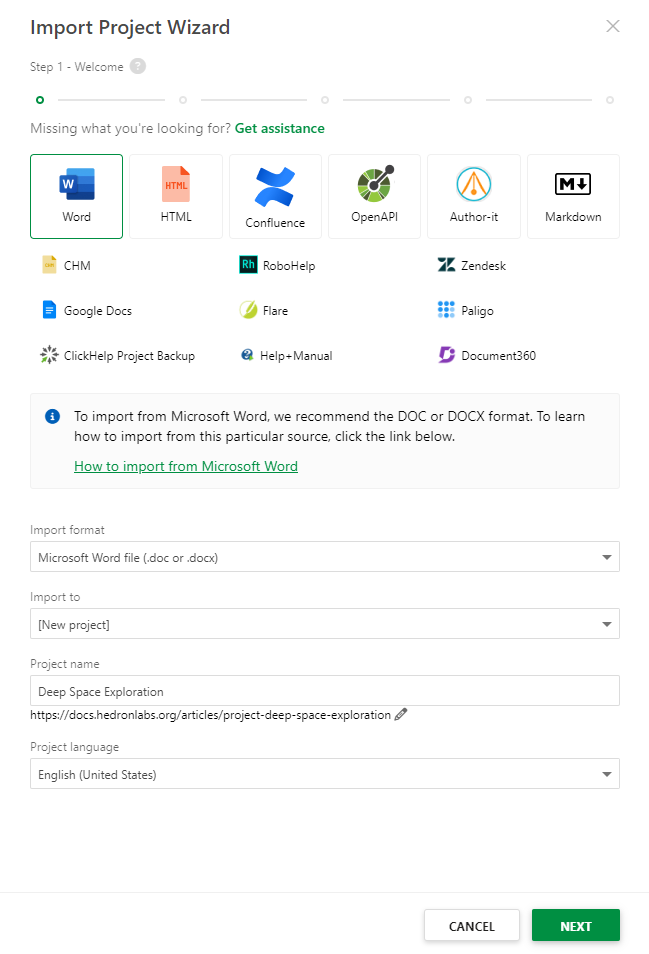
These are the settings that are available to you on this page:
- Import format. The format of the input. Once you choose the tool in the upper section, this field is automatically populated with the most applicable format for that tool. E.g., if you select Word, the system will set the Import format to Microsoft Word file (.doc or .docs). However, you can manually modify this afterward.
- Import to. Specifies whether to import documents to a new project or an existing one.
- Project name. The project name that will be displayed throughout the authoring interface. This option is visible only when importing to a new project.
- Project ID. The URL-friendly version of the name. It is usually all lowercase and contains only letters, numbers, and hyphens. By default, the project ID is based on the name, and the box is hidden — only the URL preview is shown under the Project name box. But you can change the project ID by clicking on the Customize project ID button to the right of the URL preview. This option is visible only when importing to a new project.
- Project language. Sets the language that is used by the system for various optimizations. Check out the Project Language article to learn more. This option is visible only when importing to a new project.
Step 2. Import Settings
|
|
Note |
Starting from this step, the Confluence Import Wizard is rather different from the wizards of all other formats, so please refer to the Confluence Import Wizard Reference to learn more. |
|
The second wizard page allows you to configure the format-specific settings and upload one or more source files.
On the left, there is a drag&drop area that you can use to upload the source document. If you click the area, you'll be able to select the files with your system's Open dialog.
There is the Upload an OpenAPI definition from URL (Or select a file) setting in the OpenAPI/Swagger Import Wizard that allows specifying the path to the OpenAPI/Swagger definition file.
The settings section is on the right. The number of options on this page may vary depending on the import format chosen. The complete list of options is the following:
- Topics encoding. Configures the encoding used in the source file; the default is Autodetect. This setting is only available for CHM (Microsoft Compiled Help), HTML-like (HTML, XHTML), and Open Document (.odt) formats. That's the only option available for the CHM format.
-
Split into topics by. Defines how the system will split the source document into topics. There are four possible options:
-
Style outline level (Heading 1, Heading 2...). A new topic is created for each Heading specified in the document. Different levels of Headings become parent and child topics, respectively.
- Paragraph outline level. Topics are defined by the outline levels specified in the document's paragraph settings. The hierarchy is preserved.
- TC fields. Topics are defined by TC fields (special invisible elements used in Microsoft Office to define Table of Contents) of the MS Word document. This field is not available when importing from HTML.
- Import as a single topic. The whole document is treated as one topic. This field is not available when importing from HTML.
-
Style outline level (Heading 1, Heading 2...). A new topic is created for each Heading specified in the document. Different levels of Headings become parent and child topics, respectively.
- Max outline level. Sets the depth of the Table of Contents. This field is not available when importing from HTML.
- Optimize styles, Keep precise styles, and Keep layout only. Radio buttons allow you to configure how the styles from the source document are treated. You can learn the details by reading the Handling Content Styles topic.
- Generate CSS classes. If checked, the inline styles from the source document are copied to the project Styles.css file and given automatically-generated names. This field is not available when importing from HTML.
- Import Styles To. Defines whether to import the styles into a new or an existing style file. Visible only if you are importing into an existing project and the Generate CSS classes checkbox is checked.
- Image Format. The format to use when importing images. This setting is available for Word (.doc, .docx, and RTF), and Open Document (.odt) formats.
You can read about import from each tool/format in more detail in the corresponding topics:
Step 3. Task Progress
The task progress page gives you information about the importing process; therefore, no actions from your side are needed. However, if something happens, it will show you the warnings or errors with information about the root cause of the issue.
Step 4. Finish
That's the final page of the wizard.
After the successful import, there are links to the style files associated with the project so you can edit them right away if needed. You can check out Topic Content Styling to learn more.
There is also the Open project button so you can navigate directly to the project. Alternatively, you can click Finish to close the wizard and land on the Projects page.