Portal Management and Administration
Managing your ClickHelp documentation portal is easy, whether it is project administration, user accounts handling or access permission setup. This User Manual section covers everything you need to know about portal management. The information is useful not only for portal administrators but also for authors!
- Settings
- Entire portal vs. Project
- Publication vs. Project
- Topic vs. Project
- Project & File Management
- Global Content Management (Find and Replace)
- User Management & Authentication
- Search Engine Optimization
Settings
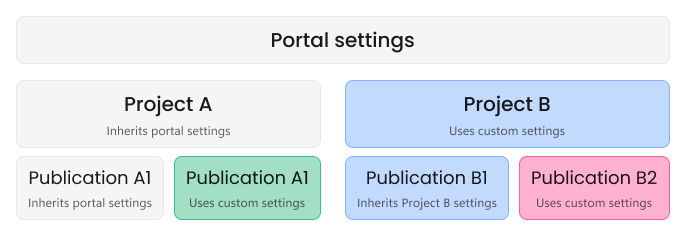
You can configure a lot of things in ClickHelp. The portal has its own settings, while projects and publications have theirs. Even topics have settings, which are called Properties. Some settings are available on certain levels only — like email notifications, which can be configured only for the entire portal. Some, like Variables or Master Page, can be configured on different levels — the entire portal level, the project level, the publication level, and, in particular cases, the topic level. In this hierarchy, the same setting from each consequent level may override the same setting from the previous one. The portal settings can be overridden on the project level, the publication settings override the project and portal settings, and the topic settings override the project/publication and the portal settings.

This makes it possible to configure projects independently, regardless of the portal settings. Such a setup is a must-have when you have different products, and documentation for each should be unique: a different color scheme, content layout, styling, etc.
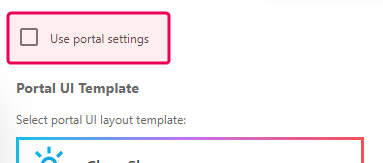
Publication inherits whichever settings its project has at the time of publishing. If a project uses the portal settings, the publication will have this checkbox selected and, in turn, will use the portal settings by default. But if a project uses custom settings — i.e., has the Use portal settings checkbox cleared — publication will copy all these settings when created but will not auto-update them each time you make changes to project settings. It's just like creating the publication — new content gets there only at the time of publishing, and any changes made to topics in the project are not reflected. Updating the publication using the Full Replace mode will overwrite the publication settings with the project ones. The partial update doesn't affect the publication settings.
Let's look at some typical use cases to illustrate the idea.
Entire portal vs. Project
Suppose you want one of your projects not to have the right sidebar. Thus, if you clear the Use portal settings checkbox on the project Reader Interface settings page, you can disable the Right sidebar for this particular project, and the change will not affect the other projects.

Publication vs. Project
Say you have a project and two publications for this project – one for the administrators and the other for the end users – and you want them to use different colors. In this case, you can open the publication settings page, and all colors you choose will be used in this particular publication.
Topic vs. Project
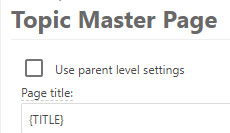
Imagine you want one topic to have a unique footer, whereas all the other topics in this project should use the standard one. In this case, if you clear the Use parent level settings checkbox in Topic Properties → Master Page, you'll be able to specify the footer markup for this particular topic.

Project & File Management
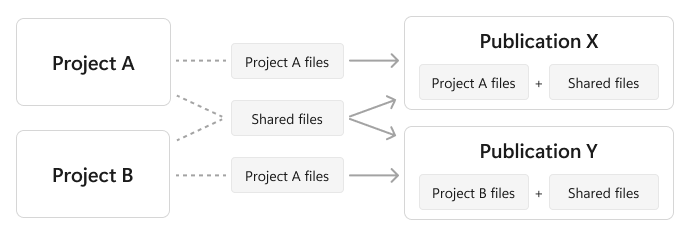
When you create a project, the system creates a folder in the File Storage for this project's files, scripts, and styles. By default, all the images you insert through the Editor when authoring content are uploaded to the project folder, but you can easily create a dedicated folder in your Storage for shared images. File Manager allows you to work with the files and folders without leaving ClickHelp.
When you create an online publication, the system creates a publication folder in the Storage. The images used — project-specific and shared — and the project styles and scripts are copied to this folder. This ensures that the publication is not affected by any changes to the original files, and readers won't experience any issues.

Each project can have any number of styles and scripts attached to it. Such a setup allows for styling each project individually, giving it a unique look and feel.
However, if all your projects need the same styling, you can reuse a style file across the whole portal. With this approach, you can manage your projects' styling in a centralized manner. For further information, you can consult the Reusing Style Files topic. This way, you can have a base of shared styles for most elements while still adding unique styles for different projects.
As your documentation grows, it's important to have control over it and manage it efficiently. In ClickHelp, such operations as copying a project, renaming a project, or archiving a project from the Projects page can be performed with a couple of clicks.
Global Content Management (Find and Replace)
If you need to find or find and replace a specific piece of text, part of a topic, or file link — even across several projects — there's no need to make hundreds of manual changes. Global Find and Replace (GF&R) allows doing it automatically in a single place. The system can search for the required content through the entire portal, including topics, styles, scripts, Review Comments, ToDo items, etc.
GF&R also supports regular expressions for advanced scenarios: Finding Content with Regular Expressions and Other Techniques.
User Management & Authentication
ClickHelp has two user types: Contributors and Power Readers. You can create as many accounts as you want, but your license limits the number of active Contributor accounts. However, these are not named licenses. Instead, we utilize the floating license model, which allows you to create new accounts and keep unused ones disabled. In addition, the number of active Power Readers is not limited.
Contributor users have a set of pre-defined roles with different sets of permissions, whereas you can create custom Access Groups for Power Readers and Contributors with the Reviewer role to fine-tune their access level in a centralized manner.
| Read User Management to learn all about user types, Contributor roles and access groups. |
Your users can authenticate to the portal using ClickHelp-specific credentials: login and password. However, it is possible to set up single sign-on authentication so that they log in using their Google, Microsoft Azure AD, or Salesforce accounts. Besides, you can use your own OpenID authentication service as well.
In addition to logging in with credentials and single sign-on, you can log in Power Readers using the login token mechanism. It allows your readers to log into the portal by clicking on a special link you provide — in this case, they are automatically logged in to your portal.
Search Engine Optimization
Several SEO-related settings allow you to increase the portal ranking in the search results.
ClickHelp automatically generates sitemap files you can submit to various search engines on the Webmaster Tools settings page. The sitemap file contains information about your documentation portal pages and the relationships between them. Submitting the sitemap files improves the speed at which search engines index all your publicly available content.
You can allow or disallow the indexing of certain pages using Robots.txt so that these pages do not appear in search results.
For example, you can disallow indexing of content that you don't want to show through the search on Google but still keep it accessible without a password.
| Robots.txt is not used to hide a page from search engines altogether. A search engine can still index the disallowed page; for example, if other pages have a link to your page, search engines could still index the URL without visiting the page. If you need to block sensitive information from being indexed, use restricted publications instead. |
To learn about the peculiarities of portal management and administration, dive further into the section:
- Managing Projects
- User Management
- IP Allowlist
- Integrations
- Search Engine Optimization (SEO)
- Custom Domain Name for Your Portal
- Gathering Reader Feedback
- Global Find and Replace
- Draft and Published Versions of Reader-Facing Pages
- Backing Up Your Data
- Project Backup
- Audit Trail
- Sandbox Portal
- Working with Data Tables