To tell the truth, technical documentation is a boring thing to read. If it contains text only, it is even worse. Users hardly ever read docs from cover to cover. They scan them. It looks like that: they jump from title to subtitle, or to text elements that stand out visually (bold or italic font), then to screenshots, tables, or diagrams, code pieces, examples, links – everything that looks different from the text. Users don’t get deep into what is written; they just want to figure out if this particular topic may help them find answers to their questions and solve their problems. If they do not get what they want, they start looking for another source of information or contact the support team, which isn’t a good sign as technical documentation is supposed to reduce the number of tickets any support team gets.
So, how can a technical writer make their manuals scannable, attractive and lively, and at the same time guide readers by showing them which information deserves special attention and which should always be kept in mind? The answer is simple: you can format documentation elements with HTML and CSS. And, in this post, we are going to discuss a solution that helps to make relevant information 100% visible – a note box.
What Is a Note Box and Its Functions?
As was already mentioned above, a note box is a good thing to indicate important pieces of text and add structure to documentation. It is one of the elements that everyone has seen thousands of times but can hardly remember what it is called. You may come across these names: Info Box, Tips, Example, NB (nota bene), Styled Box, Warning, Text Box, Callout, Info, Danger, Pull-Quote, etc.
Here’s what you can do using a note box:
- Notify
- Warn
- Alert
- Give examples
- Give tips
- Comment
- Annotate
- etc.
Though these elements always depend on the context, we cannot overlook their importance. According to our study, many readers admit that the first thing they are looking for on a page is a note box to identify where they are and what exactly they have found.
Types of Note Boxes
Note boxes serve different purposes, but actually, only two main types of note boxes are distinguished: an information box (to supply users with information) and a caution box (to warn users). Each type may be divided into subtypes depending on the importance of the message and the amount of attention a tech writer wants to attract. In some technical docs, the two above-mentioned types work well enough; other types of docs need the following: an information box, caution box, and a highly important caution box, for example. It depends on your documentation how many types of boxes you should use.
How to Create a Note Box with HTML and CSS?
If you are not a developer and are not familiar with coding, it might seem challenging for you to start creating note boxes with HTML and CSS. But things are not as scary as they seem to be. Anyone can cope with that. You create HTML markup and then beautify it with the help of CSS – that’s it. Here are the ways of creating note boxes in HTML and CSS:
Styling Paragraphs with CSS
Let’s start with styling paragraphs with CSS. This method is not difficult and doesn’t require writing a lot of code. Have a look at the example of boxes with a single paragraph and an icon:
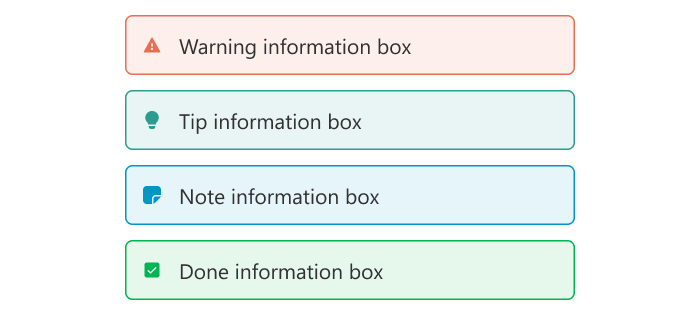
And that’s the piece of code for the boxes above:
Examples
<p class="noteBoxes type1"><img src="exclamation-triangle-solid.svg" class="picture">Warning information box</p> <p class="noteBoxes type2"><img src="lightbulb-regular.svg" class="picture">Tip information box</p> <p class="noteBoxes type3"><img src="sticky-note-regular.svg" class="picture">Note information box</p> <p class="noteBoxes type4"><img src="check-solid.svg" class="picture">Done information box</p>.noteBoxes { border: 1px solid; border-radius: 5px; padding: 10px; margin: 10px 0; width: 300px; } .type1 { border-color: #E76F51; background-color: rgba(231, 111, 81, 0.1); } .type2 { border-color: #2A9D8F; background-color: rgba(42, 157, 143, 0.1); } .type3 { border-color: #0096C7; background-color: rgba(0, 150, 199, 0.1); } .type4 { border-color: #00B353; background-color: rgba(0, 179, 83, 0.1); } .picture { width: 15px; padding-right: 10px; }
But if you break your paragraph, you’ll get one more note box. If you want to unite several paragraphs in one note box, this method is not for you.
Here is what your box is going to look like if you break a paragraph:

And this is what the HTML code looks like for the example above:
Examples
<p class="noteBoxes type3">Deep space exploration is the branch of</p>
<p class="noteBoxes type3">astronomy, astronautics and space technology</p>
In this case, it’s recommended that you use a line break instead.

Have a look at the piece of code for a note box where a line is broken by <br>:
Examples
<p class="noteBoxes type1">Deep space exploration is the branch of<br/>astronomy, astronautics and space technology</p>
Another disadvantage of this method is that you cannot use a list within a paragraph though using lists in note boxes is quite efficient.
And, this method limits where you can place icons. The best option is to place an icon to the left from the text. But in case you use this method and insert an icon as an image into the paragraph, the icon will take the position on the left from the first line, but not the whole paragraph:
![]()
And the HTML code for the above-mentioned example where an icon is inserted as an image in the paragraph:
Examples
<p class="noteBoxes type4"><img src="exclamation-triangle-solid.svg" class="note-box-icon">Deep space exploration is the branch of astronomy, astronautics and space technology</p>.note-box-icon { width: 30px; padding-right: 20px; }
Using DIVs to Create Note Boxes
As an alternative approach, you can use DIVs to create note boxes. That solves many of the above-mentioned problems: you can use several paragraphs, lists, and even pictures. But all that requires writing HTML code and a deep understanding of locating DIV elements against each other and on different display widths.
This is how a DIV-based note box looks like with a single paragraph inside:

And the piece of code for the above-mentioned box:
Examples
<div class="noteBoxes type1">Deep space exploration is the branch of astronomy, astronautics and space technology </div>
This how a DIV-based note box looks like with several paragraphs:
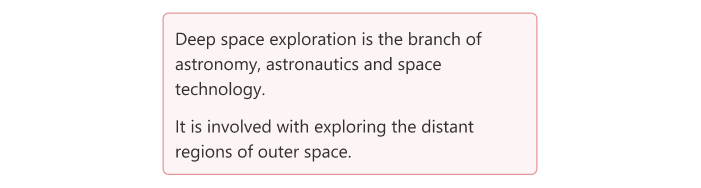
A piece of code for a DIV-based box with several paragraphs:
Examples
<div class="noteBoxes type2">
<p>Deep space exploration is the branch of astronomy, astronautics and space technology.</p>
<p>It is involved with exploring the distant regions of outer space.</p>
</div>
Here is a list in a DIV-based note box:
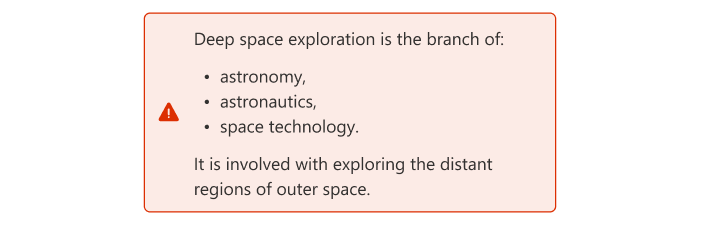
And a piece of HTML code for a DIV-based note box with a list:
Examples
<div class="noteBoxes type3" style="display:flex;">
	<img src="exclamation-triangle-solid.svg" class="note-box-icon">
	 <div>
		<p>Deep space exploration is the branch of:</p>
		<ul>
			<li>astronomy, </li>
			<li>astronautics,</li>
			<li>space technology.</li>
		</ul>
		<p>It is involved with exploring the distant regions of outer space.</p>
	</div>
</div>
Using Tables to Create Note Boxes
One more method of creating note boxes I’m going to tell you about is using tables. The simplest thing is to create a table of two columns: one for icons and one for text. This method suits for using several paragraphs, lists, and pictures. It is easier to insert a table than a structure of several DIV elements. This method is the most convenient one and allows solving the majority of problems.
This is a table-based box with an icon, several paragraphs, a link, and a list:

The HTML code for a table-based box with an icon:
Examples
<table class="noteBoxes type4">
	<tr>
	<td><img src="exclamation-triangle-solid.svg" class="note-box-icon"></td>
	<td>
		<p>Deep space exploration is the branch of astronomy, astronautics and space technology.</p>
		<a href="#">Read more about this.</a>
		<img src="picture.jpg" width="200">
<p>See also:</p>
		<ul>
			<li>Intergalactic travel</li>
			<li>Interplanetary spaceflight</li>
			<li>Interstellar travel</li>
		</ul>
	</td>
	</tr>
</table>
How to Choose Colors for Boxes and Icons
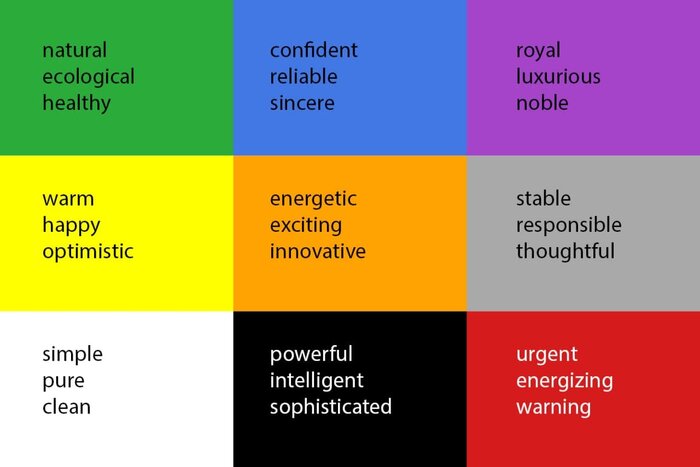
Color choice is a powerful means of communication. Colors influence the way people perceive things. Each color has a meaning and can trigger certain feelings. That becomes clear when one works on a website, app, any software product, and even online technical documentation. Did you know that the choice of colors on websites and in apps is not occasional? It is a matter of great importance which color to choose for a button – red or green. You may be surprised to learn that the click rate may increase drastically if you simply choose the right color for a small button! Take a look at the case studies in this post – Which Button Color Converts the Best?
It matters a lot what goals you have, whom you are addressing, and in what sphere you are working. For example, green colors work well when we talk about healthy food and natural products; blue colors are chosen most often for the financial sphere and insurance; purple – luxury and high-quality products; yellow is often used for children’s goods; orange is used to encourage impulse purchases, gray is neutral but is often chosen by prestigious brands as it underlines their thoughtfulness, etc.
The same is true to life when we need to choose a color for a note box. The color choice has a great impact on how users perceive the information in your box. In general, remember the following:
- red is used for warnings and to indicate danger
- orange can be used for cautions as well
- examples and tips can be blue
- helpful additional information can be green
Of course, it is up to you which colors to choose but working on visual elements of your technical documentation, you should keep in mind not only corporate guidelines, personal tastes, and color psychology, but also accessibility.
Accessibility implies that a software product can be used in a variety of ways that don’t depend on a single ability or sense. People with various disabilities (limited movement, hearing and deafness loss, low vision and blindness, cognitive limitations, speech disabilities, learning disabilities, etc.) need a possibility to use a software product like all other customers.
When we talk about technical documentation, first of all, we mean the choice of particular colors and color combinations, fonts, the quality of visual materials, and many more things.
One of the problems is color blindness. Some people are not able to differentiate between particular colors. For example, red and green. That should be taken into consideration when creating note boxes. You cannot rely only on the color choice when you create a warning box or another type of box. You need additional meaningful signs like icons. They help color blinded users understand quickly what kind of information they are reading. Besides, icons make any tedious documentation nice-looking and stylish. There are a lot of sources where you can get great icons, some of them are free. Here is the list of useful sources:
There are other tips for making technical documentation accessible: using font size 16 or more and 1.5 line spacing, using colors that create contrast, etc. Read our posts – Technical Documentation for Visually Impaired and Technical Documentation for Color Blind to avoid mistakes when creating accessible technical documentation.
How to Create a Note Box in ClickHelp
There are different types of technical writing tools, and they solve tech writing problems in different ways. For example, they offer totally different mechanisms for creating note boxes. Some of them are easier; others are more complicated. Even MS Word allows creating note boxes by inserting tables.
The main problem here is that one and the same technical writer may occasionally create note boxes that have slightly different styles: one may choose by mistake a bit different color or a bit different size. It means that the note boxes in the same document will not be identical, which leads to inconsistencies and poor perception by readers.
ClickHelp solves that problem allowing you to easily deal with note boxes. You can create a note box and save it as a Quick Parts element – a separately stored element that can be inserted in any topic. Your note boxes will be nice-looking and identical throughout your whole document.
This video demonstrates how easily you can insert a note box in ClickHelp:
It is always easier to stick to the chosen style if you are the sole technical writer. But how to manage that if you work in a team? In ClickHelp, collaboration within a team is not a problem. Such elements as Quick Parts are global for the whole portal, and each new one will be available to all authors in your portal. It means that you and all your teammates can use the same note boxes working on different topics of the same documentation project or on different documentation projects even if your progects are developer documentation and online tutorial. The style and formatting of your documentation will always be the same.
Apart from that, Quick Parts allow the use of other generic elements of any complexity because they can be created in the form of HTML code – you can use any HTML markup for a Quick Parts element you’re adding. That is very helpful when you need to use peculiar elements in your technical documentation.
If you want to learn more about the ClickHelp tool, schedule a demo with our Team.

Conclusion
Using note boxes is a very good solution to underline some information and stand it out visually. The above-mentioned ways of creating boxes require knowledge of HTML and CSS. But at the same time, you don’t have to be a developer to master that. If you are a technical writer, you should definitely use a help authoring tool to unify your work on note boxes which will add to the consistency of your technical documentation.
Good luck with your technical writing!
ClickHelp Team
Author, host and deliver documentation across platforms and devices