AI agents are evolving into essential tools used in everyday work, but they still have a hard limit: without access to your real data and systems, they can only guess about the content and context. MCP (Model Context Protocol) is an open standard from Anthropic that solves this problem. It gives AI clients a unified way to talk to any data source or tool you need through an MCP server.
Previously, each integration needed its own custom connector, authentication, APIs, and data formats separately for every app. MCP standardizes this process. It works like the all-purpose USB‑C for hardware: write an MCP server once, and any MCP‑compatible client can use it without bespoke code.
In this step‑by‑step guide, we will explain how to create an MCP server in Python from scratch, walk through the full MCP server setup and installation, connect it to Claude Desktop, and see your custom tool show up inside the UI. By the end, you will have a working local server and know how to debug it with MCP Inspector. Moreover, you will be ready to extend it with more tools and data sources tailored to your documentation and engineering workflows.
What Is an MCP Server?
MCP is an open, language‑agnostic protocol. This means it doesn’t depend on a specific programming language. It is used for connecting AI applications to external systems such as databases, documentation portals, internal APIs, and developer tools. An MCP server exposes those systems (literally “shows” their content) to AI clients in a standardized way, while the MCP client (for example, Claude Desktop) talks to the server and uses the content it provides.
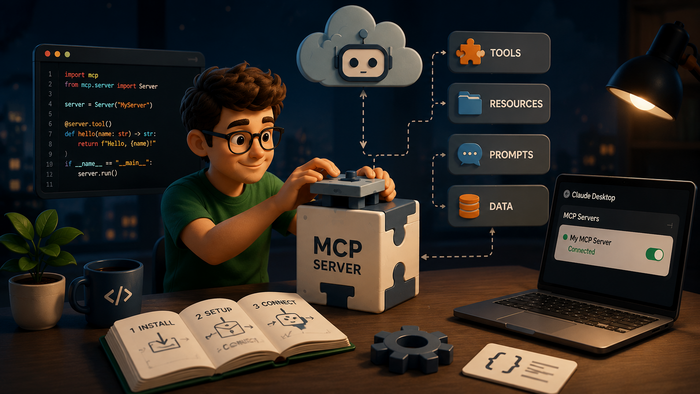
An MCP server can expose three kinds of capabilities:
- Tools: callable functions the model can invoke, similar to POST endpoints in an API.
- Resources: readable data the model can fetch, similar to GET endpoints or files.
- Prompts: reusable interaction templates the client can fill and send.
There are two main deployment modes:
- Local servers run on the same machine as the client and communicate via stdio (standard input/output streams).
- Remote servers run in the cloud or on another host and communicate via HTTP/SSE.
In this article, we will explain how to build a local stdio server and work seamlessly with Claude Desktop’s built‑in MCP support. The high‑level architecture is: Claude Desktop (host) → MCP client → MCP server → your tools and data sources. For protocol internals and advanced features, refer to the official documentation.
Prerequisites
Before you install MCP and start the server setup, make sure you have the following in place:
- Python 3.10 or newer installed on your PC.
- uv, a modern package and virtual environment manager for Python, recommended by the MCP docs for managing Python‑based servers. Installation instructions are here.
- Claude Desktop installed on macOS or Windows: read. (It is not available on Linux. Linux users can test local MCP servers using MCP Inspector instead of Claude Desktop).
- Basic command‑line knowledge: changing directories, running commands, and editing files.
The examples use uv because it simplifies isolated environments and includes MCP’s CLI tooling, but if you prefer pip you can adapt the steps. You will just need to manage virtual environments and scripts yourself.
Building Your MCP Server Step by Step
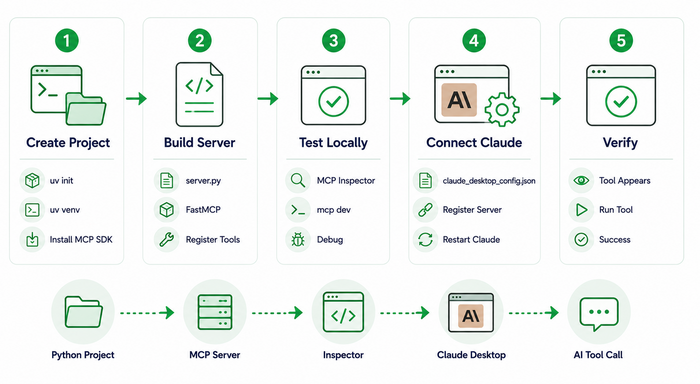
This is the core of the guide: you will create a project, add dependencies, write a minimal server, test it with MCP Inspector, and connect it to Claude Desktop — the full MCP server installation, start to finish.
Step 1 – Create the Project and Install Dependencies
Run the following in your terminal:
uv init mcp-server-demo

cd mcp-server-demo

uv venv

source .venv/bin/activate # Windows: .venv\Scripts\activate

uv add "mcp[cli]"
Here is what happens: uv init mcp-server-demo creates a new project directory with a standard Python project structure and a pyproject.toml file. uv venv sets up an isolated virtual environment so your server’s dependencies do not conflict with global Python packages. Activating the environment with source .venv/bin/activate (or .venv\Scripts\activate on Windows) ensures that python and uv commands run inside this project scope. Finally, uv add “mcp[cli]” installs the Python MCP SDK together with the CLI needed to run mcp dev and open MCP Inspector later.
Step 2 – Implement the Server
Create a file called server.py in the mcp-server-demo directory and add:
from mcp.server.fastmcp import FastMCP

mcp = FastMCP("demo-server")

@mcp.tool()

def get_current_time() -> str:

    """

    Returns the current date and time.

    """

    from datetime import datetime

    return datetime.now().strftime("%Y-%m-%d %H:%M:%S")

if __name__ == "__main__":

    mcp.run(transport="stdio")
FastMCP is a high‑level helper built on top of the official Python MCP SDK. It hides the low‑level protocol details so you can focus on tool logic instead of wiring request/response handlers. Its API style is intentionally familiar if you have used frameworks like FastAPI.
The @mcp.tool() decorator registers get_current_time as an MCP tool that will be visible to clients like Claude as a callable operation. The triple‑quoted string (“””Returns the current date and time.”””) is a docstring. MCP clients use this description to decide when and how to call the tool, so a clear, specific docstring improves tool selection reliability. The transport=”stdio” argument tells FastMCP to run the server using standard input/output streams, which is the default pattern for local MCP servers communicating with desktop clients.
Step 3 – Local Testing with MCP Inspector
Before touching Claude Desktop, confirm that the server starts and responds correctly. In the activated environment, run:
mcp dev server.pyThe mcp dev command starts your MCP server and launches MCP Inspector in the browser, acting as a test harness and proxy. You can manually trigger tools, inspect input/output payloads, and see logs without any desktop client configuration.
If something fails at this stage (server not starting, import errors, or tool calls returning tracebacks), focus on fixing the code and environment first. The problems that arise in MCP Inspector usually mean the issue is entirely on the server side, which is easier to debug before layering Claude Desktop configuration on top.
Step 4 – How to Connect Your MCP Server to Claude Desktop
Once the server runs cleanly, you can register it with Claude Desktop. The MCP configuration file is named claude_desktop_config.json and is located here by default:
- macOS: ~/Library/Application Support/Claude/claude_desktop_config.json
- Windows: %APPDATA%\Claude\claude_desktop_config.json
If the file does not exist, create it. Add the following content, replacing the path with the absolute path to your project directory:
{

  "mcpServers": {

    "demo-server": {

      "command": "uv",

      "args": [

        "--directory",

        "/ABSOLUTE/PATH/TO/mcp-server-demo",

        "run",

        "server.py"

      ]

    }

  }

}
The mcpServers object lists MCP connectors by name, and each entry tells Claude how to start a server: the command (uv) plus arguments specifying the working directory and script to run. The path must be absolute (for example, /Users/yourname/Projects/mcp-server-demo or C:\Users\yourname\mcp-server-demo). Relative paths like ./mcp-server-demo will not work and are a common reason the server never appears in Claude. After editing the file, fully quit Claude Desktop and restart it so the configuration is reloaded.
Step 5 – Verify the Server Inside Claude Desktop
After restarting Claude Desktop, look at the bottom of the window near the input field: you should see a hammer icon. The number next to it indicates how many MCP servers are connected. Click the hammer icon to open the tools panel and verify that your server and the get_current_time tool are listed.
Now type a natural question, for example, “What time is it?”. Claude will decide that get_current_time is a relevant tool, call it via MCP, and return the current time directly in the chat. If you see a tool call in the side panel and the response contains the formatted date and time from your server, you have successfully wired up your first MCP server.
Now you have a complete minimal pipeline: from a user request in the desktop client, through your Python code, back to the AI’s response. This gives you a solid MCP “skeleton server” you can extend with more tools and resources, gradually turning Claude from a generic assistant into a deeply integrated part of your documentation and engineering workflow.
Extending the Server: Adding More Tools
Adding a second tool to your server is just a matter of defining another function and decorating it with @mcp.tool() in the same file (no separate registration step is required). FastMCP scans all decorated functions when the server starts and exposes them automatically.
For example, add this below get_current_time:
@mcp.tool()

def convert_celsius_to_fahrenheit(celsius: float) -> str:

    """

    Converts temperature from Celsius to Fahrenheit.

    :param celsius: Temperature in Celsius

    """

    fahrenheit = (celsius * 9/5) + 32

    return f"{celsius}°C = {fahrenheit}°F"
The type annotation celsius: float allows FastMCP and the MCP SDK to generate an accurate JSON Schema for the tool’s parameters so clients like Claude can validate and pass arguments correctly. Removing or weakening type hints can lead to confusing behavior where tools receive unexpected data or are harder for the model to use.
As with the first tool, the docstring guides the model’s tool selection. A precise description of what the function does, each parameter, and the return format makes it less likely that Claude calls the wrong tool or supplies invalid values. For documentation‑heavy environments, treating these docstrings as mini API docs pays off in more reliable automation.
Common Pitfalls and How to Fix Them
Most first‑time MCP setups run into a small set of repeatable issues. The table below summarizes typical problems, likely causes, and practical fixes.
| Problem | Likely cause | Recommended fix |
| Hammer icon does not appear in Claude Desktop | Server failed to start or config JSON is invalid | Double‑check the absolute path and config syntax. Inspect logs ~/Library/Logs/Claude/mcp-server-demo.log (macOS). |
| Error on startup: command not found: uv | uv not installed or not on the system PATH | Install uv from docs.astral.sh/uv and restart your terminal session. |
| Claude does not call the tool | Docstring is too vague or missing | Write a specific description of what the tool does, its parameters, and return value. |
| Server starts but Claude does not see it | Config file in wrong location or malformed JSON | Verify the OS‑specific config path and validate JSON with a tool like jsonlint. |
Security is also worth mentioning: a local MCP server runs with your user’s permissions and can access local files, environment variables, and other resources if you implement tools that touch them. Only connect servers you trust, and avoid copying unknown configurations or code snippets into your environment without review, especially in corporate or regulated settings.
What’s Next
A single working server is only the starting point. To go further, you can do the following:
- Explore resources. In this guide, you used tools, which the model calls actively. Resources work differently: they are data the client can read passively, such as configuration snapshots or documentation pages exposed via MCP. The official docs describe resources in detail in the concepts section.
- Consider remote servers. Local stdio servers only work on the machine where they run. If you want MCP access from multiple devices or need to deploy in the cloud, switch to HTTP/SSE transport and host the server on a web‑accessible endpoint. The SDK supports both modes with relatively small code changes.
- Reuse pre‑built servers. Anthropic and the community maintain a registry of ready‑made MCP servers for filesystems, Git, databases, Slack, and many other systems. This can save time when you need standard integrations.
- Connect documentation portals. ClickHelp, for example, offers an MCP server that exposes entire documentation portals (topics, TOC, search, and editing) to AI agents, so they can read and work with docs much like human authors.
Conclusion
MCP removes one of the biggest friction points between AI agents and real work. It eliminates the need to develop a separate integration for every application and data source. With a single MCP server, your tools and data become available to any compatible client, from Claude Desktop to other MCP‑aware platforms.
The entry barrier is low: a few dozen lines of Python, one config file, and a bit of command‑line work. This is enough to get a local server running and make it visible in Claude. From this point, you can scale the server alongside your needs: get more tools, richer resources, or full documentation portal access through platforms like ClickHelp. For a technical writer or engineer, this is a practical way to turn AI from a generic assistant into a tightly integrated part of your toolchain.
Good luck with your technical writing!
Author, host and deliver documentation across platforms and devices
FAQ
How do I create an MCP server?
You install the Python MCP SDK with uv add “mcp[cli]”, write a Python file that defines your tools using the @mcp.tool() decorator from FastMCP, and run it with mcp.run(transport=”stdio”). That’s the full server setup for a local server — no additional framework is required.
How do I install MCP?
For a Python project, run uv add “mcp[cli]” inside an activated virtual environment (or pip install “mcp[cli]” if you prefer pip). This installs both the MCP SDK and the CLI tools used for local testing.
How do I connect an MCP server to Claude Desktop?
Add an entry for your server under mcpServers in the claude_desktop_config.json file, specifying the command and the absolute path to your project. After saving the file, fully restart Claude Desktop — a hammer icon will appear near the input field once the server connects.
Where is the MCP configuration file located?
On macOS: ~/Library/Application Support/Claude/claude_desktop_config.json. On Windows: %APPDATA%\Claude\claude_desktop_config.json. If it doesn’t exist yet, you can create it manually.
Why doesn’t Claude Desktop see my MCP server?
This is almost always one of two things: the path in the config isn’t absolute, or the JSON in the config file has a syntax error. Validate the file with a tool like jsonlint and double-check the path before anything else.
Can I build an MCP server without uv?
Yes. uv is recommended because it manages the virtual environment and dependencies in one step, but you can use pip install “mcp[cli]” and a standard venv instead — the server code itself doesn’t change.
Does an MCP server work with clients other than Claude Desktop?
Yes. MCP is an open protocol, so any MCP-compatible client — Cursor, Windsurf, and others — can connect to a server built this way without changes to the server code.